Solving jQuery Version Conflict in the Same Project

In a recent project I was leading, we faced an interesting challenge that I believe is worth sharing. Our legacy codebase heavily relied on jQuery 1.1.8, but we needed to integrate Google Maps into our application, which required a newer version of jQuery (at least 1.2). Rewriting or upgrading the entire application to use a newer jQuery version was not feasible due to time constraints and potential risk of breaking existing functionality. Here’s how we managed to use two different versions of jQuery on the same page without any conflicts.

The Problem

Our existing application used jQuery 1.1.8, and changing this version was not an option due to the extensive usage throughout the codebase. However, the Google Maps API required at least jQuery 1.2. This version incompatibility posed a significant challenge, as loading multiple versions of jQuery can lead to conflicts.

The Solution

The solution involved using jQuery’s noConflict mode to manage multiple versions on the same page. Here’s a step-by-step guide on how we implemented this.

  • Load the Older Version of jQuery

First, we ensured that the older version of jQuery (1.1.8) was loaded as usual for our existing application functionality.

<!DOCTYPE html>
<html>
<head>
  <title>Multiple jQuery Versions Example</title>
  <!-- Load the older version of jQuery (1.1.8) -->
  <script src="path/to/jquery-1.1.8.min.js"></script>
</head>
<body>
  <!-- Our existing code and scripts that depends on jQuery 1.1.8 -->

  <!-- Google Maps section -->
  <div id="map-canvas" style="width: 100%; height: 400px;"></div>

  <!-- Load the newer version of jQuery -->
  
  <!-- Load the Google Maps API -->
  <script src="https://maps.googleapis.com/maps/api/js?key=<OUR API KEY>"></script>
</body>
</html>
  • Load the Newer Version of jQuery

Next, we loaded the newer version of jQuery required for the Google Maps API. We used the noConflict method to ensure it did not interfere with the older version.

<!-- Load the newer version of jQuery -->
<script src="https://ajax.googleapis.com/ajax/libs/jquery/1.12.4/jquery.min.js"></script>
<script>
  var jQueryNew = $.noConflict(true);
</script>

The true parameter in the noConflict method call ensures that the new jQuery version is completely isolated, preventing it from overriding the older version.

  • Initialize Google Maps Using the Newer jQuery Version

We then wrote the Google Maps initialization code using the new jQuery version (jQueryNew).

<script>
  jQueryNew(document).ready(function($) {
    function initialize() {
      var mapOptions = {
        zoom: 8,
        center: new google.maps.LatLng(-34.397, 150.644)
      };
      var map = new google.maps.Map(document.getElementById('map-canvas'), mapOptions);
    }
    
    google.maps.event.addDomListener(window, 'load', initialize);
  });
</script>

Complete solution looked like

<!DOCTYPE html>
<html>
<head>
  <title>Multiple jQuery Versions Example</title>
  <!-- Load the older version of jQuery (1.1.8) -->
  <script src="path/to/jquery-1.1.8.min.js"></script>
</head>
<body>
  <!-- Your existing content that depends on jQuery 1.1.8 -->

  <!-- Google Maps section -->
  <div id="map-canvas" style="width: 100%; height: 400px;"></div>

  <!-- Load the newer version of jQuery -->
  <script src="https://ajax.googleapis.com/ajax/libs/jquery/1.12.4/jquery.min.js"></script>
  <script>
    var jQueryNew = $.noConflict(true);

    jQueryNew(document).ready(function($) {
      function initialize() {
        var mapOptions = {
          zoom: 8,
          center: new google.maps.LatLng(-34.397, 150.644)
        };
        var map = new google.maps.Map(document.getElementById('map-canvas'), mapOptions);
      }
      
      google.maps.event.addDomListener(window, 'load', initialize);
    });
  </script>

  <!-- Load the Google Maps API -->
  <script src="https://maps.googleapis.com/maps/api/js?key=YOUR_API_KEY"></script>
</body>
</html>

Conclusion

By using jQuery’s noConflict mode, we successfully integrated Google Maps into our project without upgrading the entire codebase to a newer jQuery version. This approach allowed us to meet the project requirements while minimizing risks and maintaining the stability of our existing application.

I hope this solution helps others facing similar challenges. If you have any questions or need further clarification, feel free to leave a comment!

Understanding Higher-Order Components (HOCs) in React with a Real-World Example

Higher-Order Components (HOCs) in React can seem like a complex concept, especially if you’re not deeply embedded in the React ecosystem. However, they are a powerful tool for managing component logic and reusability. In this article, I’ll try to demystify HOCs and illustrate their usage with a relatable real-world example.

What is a Higher-Order Component?

In simple terms, a Higher-Order Component (HOC) is a function that takes a component and returns a new component with added functionality. It’s a pattern used to share common logic between multiple components without repeating code.

Think of HOCs as decorators in a coffee shop. You have a basic coffee, and you can enhance it by adding milk, sugar, or flavors, making it a cappuccino, latte, or vanilla coffee. The basic coffee remains the same, but the enhancements (HOCs) provide additional features.

Real-World Example: Access Control in a Web Application

Imagine a web application where certain pages are restricted to users with specific roles, such as admin or manager. We need a way to enforce this access control across various components without duplicating the logic. This is where HOCs come in handy.

Step-by-Step Implementation

  • Basic Component

First, let’s create a basic component that displays a dashboard.

import React from 'react';

function Dashboard() {
  return <div>Welcome to Admin Dashboard</div>;
}

export default Dashboard;
  • HOC for Access Control

Next, we’ll create an HOC that checks if the user has the required role to view the component.

import React from 'react';

function withAuthorization(WrappedComponent, allowedRoles) {
  return function(props) {
    const { user } = props;

    if (allowedRoles.includes(user.role)) {
      return <WrappedComponent {...props} />;
    } else {
      return <div>Access Denied</div>;
    }
  };
}

export default withAuthorization;

This ‘withAuthorization ‘HOC takes two arguments: the ‘WrappedComponent‘ (the component to be enhanced) and ‘allowedRoles‘ (an array of roles permitted to view the component). It returns a new component that either renders the WrappedComponent or displays an “Access Denied” message based on the user’s role.

  • Using the HOC

Now, let’s use the ‘withAuthorization‘ HOC to protect the ‘Dashboard‘ component.

import React from 'react';
import Dashboard from './Dashboard';
import withAuthorization from './withAuthorization';

const user = { role: 'admin' }; // Example user object

const AuthorizedDashboard = withAuthorization(Dashboard, ['admin', 'manager']);

function App() {
  return (
    <div>
      <AuthorizedDashboard user={user} />
    </div>
  );
}

export default App;

In this example, we create an ‘AuthorizedDashboard‘ by wrapping the Dashboard component with the ‘withAuthorization‘ HOC. We specify that only users with the role of ‘admin’ or ‘manager’ can access this component.

  • Rendering the Application

When the App component is rendered, the ‘AuthorizedDashboard‘ will check the user’s role. If the user’s role is included in the allowed roles, the Dashboard will be displayed. Otherwise, an “Access Denied” message will appear.

Benefits of Using HOCs

  1. Code Reusability: HOCs allow you to encapsulate reusable logic in a single place. This makes your code more modular and maintainable.
  2. Separation of Concerns: HOCs help separate the logic of enhancing components from the components themselves. This keeps components focused on their primary purpose: rendering UI.
  3. Consistency: By using HOCs, you ensure consistent behavior across your application. For instance, access control logic implemented in an HOC will be consistently applied to all components that use it.

Conclusion

Higher-Order Components (HOCs) are a powerful pattern in React for enhancing components with reusable logic. By abstracting common functionality, such as access control, into HOCs, you can keep your code DRY (Don’t Repeat Yourself) and maintainable.

In this real-world example, it’s demonstrated how to use an HOC to manage access control in a web application. This pattern can be extended to various scenarios, such as logging, error handling, and more.

Understanding and leveraging HOCs can significantly improve your React development process, leading to cleaner, more efficient, and scalable code.

ReactJS Class Components vs Functional Components – a quick tour

Recently my team was tasked with a project that was developed in ReactJS to be modernized and made more performance optimized. The project was developed using a mix of class components and functional components, without any state management nor any performance considerations for large amounts of data payloads from server. We decided to move the project from class components to functional components, add redux for state management and bring in several performance optimizations. When working with the project I realized that the original development was done without understanding subtle difference and similarities between class components and functional components as well as about the usage of life cycle hooks.

Hence, I thought of sharing some key and fundamental difference between the two so that this could be used as a reference in the future.

  • Component Definition

Functional Components

function MyComponent(props) {
  return <div>Hello, {props.name}!</div>;
}

Class Components

import React, { Component } from 'react';

class MyComponent extends Component {
  render() {
    return <div>Hello, {this.props.name}!</div>;
  }
}
  • State Management

Functional Component with ‘useState

import React, { useState } from 'react';

function Counter() {
  const [count, setCount] = useState(0);

  return (
    <div>
      <p>You clicked {count} times</p>
      <button onClick={() => setCount(count + 1)}>
        Click me
      </button>
    </div>
  );
}

Class Component with ‘this.state

import React, { Component } from 'react';

class Counter extends Component {
  constructor(props) {
    super(props);
    this.state = { count: 0 };
  }

  render() {
    return (
      <div>
        <p>You clicked {this.state.count} times</p>
        <button onClick={() => this.setState({ count: this.state.count + 1 })}>
          Click me
        </button>
      </div>
    );
  }
}
  • Lifecycle Methods

Functional Component with ‘useEffect

import React, { useEffect } from 'react';

function Timer() {
  useEffect(() => {
    const timer = setInterval(() => {
      console.log('Tick');
    }, 1000);

    return () => clearInterval(timer);
  }, []);

  return <div>Check the console</div>;
}

Class Component Lifecycle Methods

import React, { Component } from 'react';

class Timer extends Component {
  componentDidMount() {
    this.timer = setInterval(() => {
      console.log('Tick');
    }, 1000);
  }

  componentWillUnmount() {
    clearInterval(this.timer);
  }

  render() {
    return <div>Check the console</div>;
  }
}
  • Handling Events

Functional Component

import React from 'react';

function ClickHandler() {
  const handleClick = () => {
    console.log('Button clicked');
  };

  return <button onClick={handleClick}>Click me</button>;
}

Class Component

import React, { Component } from 'react';

class ClickHandler extends Component {
  handleClick = () => {
    console.log('Button clicked');
  };

  render() {
    return <button onClick={this.handleClick}>Click me</button>;
  }
}
  • Props and State Comparison

Functional Component

function Greeting(props) {
  return <h1>Hello, {props.name}</h1>;
}

function ParentComponent() {
  const [name, setName] = useState('World');

  return (
    <div>
      <Greeting name={name} />
      <button onClick={() => setName('React')}>Change Name</button>
    </div>
  );
}

Class Component

import React, { Component } from 'react';

class Greeting extends Component {
  render() {
    return <h1>Hello, {this.props.name}</h1>;
  }
}

class ParentComponent extends Component {
  constructor(props) {
    super(props);
    this.state = { name: 'World' };
  }

  render() {
    return (
      <div>
        <Greeting name={this.state.name} />
        <button onClick={() => this.setState({ name: 'React' })}>Change Name</button>
      </div>
    );
  }
}
  • Context API

Functional Component with ‘useContext

import React, { createContext, useContext } from 'react';

const MyContext = createContext();

function ChildComponent() {
  const value = useContext(MyContext);
  return <div>{value}</div>;
}

function ParentComponent() {
  return (
    <MyContext.Provider value="Hello from Context">
      <ChildComponent />
    </MyContext.Provider>
  );
}

Class Component with ‘Context.Consumer

import React, { Component, createContext } from 'react';

const MyContext = createContext();

class ChildComponent extends Component {
  render() {
    return (
      <MyContext.Consumer>
        {value => <div>{value}</div>}
      </MyContext.Consumer>
    );
  }
}

class ParentComponent extends Component {
  render() {
    return (
      <MyContext.Provider value="Hello from Context">
        <ChildComponent />
      </MyContext.Provider>
    );
  }
}
  • Higher-Order Components (HOCs)

Functional Component (HOC)

import React from 'react';

function withLogging(WrappedComponent) {
  return function(props) {
    console.log('Component rendered with props:', props);
    return <WrappedComponent {...props} />;
  };
}

function MyComponent(props) {
  return <div>{props.message}</div>;
}

const MyComponentWithLogging = withLogging(MyComponent);

Class Component (HOC)

import React, { Component } from 'react';

function withLogging(WrappedComponent) {
  return class extends Component {
    componentDidMount() {
      console.log('Component rendered with props:', this.props);
    }

    render() {
      return <WrappedComponent {...this.props} />;
    }
  };
}

class MyComponent extends Component {
  render() {
    return <div>{this.props.message}</div>;
  }
}

const MyComponentWithLogging = withLogging(MyComponent);

Conclusion

  • State Management: Use useState in functional components and this.state in class components.
  • Side Effects: Use useEffect in functional components and lifecycle methods (componentDidMount, componentWillUnmount, etc.) in class components.
  • Event Handling: Both use similar syntax, but class components use this to refer to class methods.
  • Context API: Use useContext in functional components and Context.Consumer in class components.
  • HOCs: Higher-Order Components work similarly in both, but syntax differs slightly.

In conclusion, understanding the above key differences and similarities will help to navigate and work between functional and class components effectively.

Building a Strategic Security Roadmap – What I learnt over the years…

Several years back I had my first stint at building a strategic security road map to a client I was working with. I must say I was not a practiced and seasoned expert who knew “a-z” of building security strategies and road maps. So as usual, I just rolled up my sleeves and started digging in to finding out all I can about what needs to be done, who are involved , what should be my approach and thousand other questions I had. This did lead me down many rabbit holes, and after several years of researching, discussing with experts, working with security architects and many implementations later, I have come a little bit further down the road of implementing security strategies and I assume I am bit wiser (so I would like to think).

In this blog series I will try to impart what I have learnt so far in my journey in helping multiple clients implement security road maps from undersetting the need, planning, documenting, getting the buy in, to implementing security road maps.

So the first thing I needed to understand was the big “WHY”

Why do we need implement a security strategy in the first place? my take on it and as I see it, was for any organization to ensure that their “valuables”, such as information technology or systems or data are kept safe from unwanted access and usage.

Well, what does that mean then ?

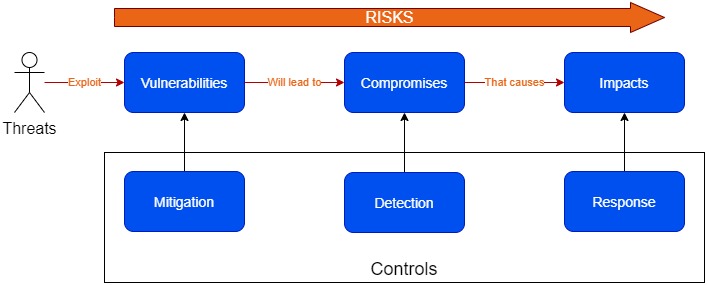
Well, any organization has things that they value , such as data, systems, devices, or any other components that has business value to the organization, which are called “Assets“. Through a weakness in the organizations environment called “Vulnerabilities“, assets can be exploited by intruders called “Threats“. Hence these are the “Risks” that any organization will face. When building our strategy we are suppose to identify these risks and come up with plans, designs, and actions to mitigate these risks. We have to do this by putting relevant controls in place

When defining risks and their corresponding controls, we will need to consider

  1. The opportunity for threats to exploit vulnerabilities with controls for mitigation.
  2. The chance that a vulnerability will lead to a compromise by using controls for detection.
  3. The effect that a compromise has, in terms of impact by using controls to response.

In order to implement a strategy we will need to come up with a strategy that allows an organization continuously look at,

  • Planning – studying and then designing a resistant security architecture for various IT projects in line with business needs and risk acceptance
  • Developing – prerequisites for networksfirewallsrouters, and other network devices
  • Performing – vulnerability assessmentsecurity testing, and risk analysis
  • Researching – the updated security standards, systems, regulatory frameworks and best practices
  • Communicating – relevant risks, vulnerabilities, and mitigation strategies to senior leadership

So how do we go about doing this…

Well, this is just the start on my approach to enable an organization to implement a security road map. In my next articles I dive a bit deeper, by taking a case study on an actual implementation of a strategic security roadmap, what was learnt, what went right , what failed, and some tips and tricks .

Duties of a Software Architect – build for customer needs, not ours.

In my previous article (UNDERSTANDING THE ROLE OF A SOFTWARE ARCHITECT), I explained the role of a software architect as well how we can categorize software architects. Whilst writing that article what came to my mind is, do we really know what our duties or responsibilities are as an architect. So I decided write from my experience what are some key duties or responsibilities from us as architects.

One of the key challenges, which I have seen many times in projects and dealing with other architects  or even myself for a major part of my career (which is over 21 years  now), where most times we as architects try to come up with technological and architectural solutions but we miss the actual problem we are trying to solve. Sure, we know all the tools, the technologies, the diagrams, and the notations but for what we are using these tools of our trade is a sometime a question.  I believe as an architect the most important thing required by us is not a technical write up or an end state diagram or even a large solutions document, but simply to understand what’s the problem or the challenges our customers have. Given below are some projects from my experience where the teams almost missed the clients need by trying to build sophisticated solutions but by re-evaluating the actual customers need were able to come up with “Just good enough architecture” to help the clients to get what they need.

In a project one of our customers had an issue where their system which had grown organically over the years was at a state where it was not able to scale to handle the traffic volumes any more. The architecture teams were tasked at re-implementing the key areas of the systems that needed to scale. The team came up with a pretty cool target state, but that would be almost a complete rewrite of some major areas of the system and potentially would take a considerable time and effort. However rather than jumping in to building this cool new target state, the team decided to re evaluate what the actual need was, was it to build this super cool system that can scale at large in couple of years or was it to handle the traffic loads incrementally so that business see’s the system improve and scale with the demands. Once we identified the actual need of the customer was to have the system to have the ability to grow with the traffic growth gradually as well as have a buffer and resiliency to a sudden spike, we came up with a road map on how to get to our target state incrementally. Then by  developing some simple optimizations to the data base structure, queries, introducing parallel processing to some key areas that were impacted with traffic growth, and a bit of additional hardware to support the parallel processing,  we were able to handle almost 3x the traffic load. Whilst the business was enjoying the scale, the team worked in introducing caching to reduce the loads on the database, decentralizing the data base so that loads could be handled by slave data stores, and working on breaking the system’s key areas to service orientation with cloud native features and ability to add hardware on the fly (elasticity). This bought the system to be scaled at large and it also gave the business an immediate return on investment as their business grew exponentially.

In another system, which was logistic based, the team had architected a sophisticated solution where it was micro service based, and with rich front end UI’s using the latest front end scripting frameworks and web applications. A major part of the development effort was going for the web and mobile front to make sure that they were very attractive and user friendly. However when we again re-evaluated to look at the actual need of the client, and how the client would use the system operationally, we identified that the operational staff at the client end rarely needed to use a UI, what they really needed was a simple list with data to do their job and to get the list printed when needed. Once this was identified the need for sophisticated UI’s was no longer a need. This reduced a huge complexity from the system and cut down a major portion of development efforts. Another area identified was the system mainly needed trigger based jobs that needed to execute periodically and rather than developing the components as web applications or web services as originally planned, just doing simple CLI’s- the system complexity, cost of infrastructure and development efforts could be reduced drastically.

We had a request from one of the clients that they were having a challenge where they were getting data from various sources and the time taken to load that data to their main system, which needed to happen regularly, was extremely high. Their recommendation was to see if a data science approach can be taken to use machine learning to reduce the overall time taken. So the teams were engaged and architectures were planned. However a closer look at trying to understand what the actual challenge the customer had, we identified that the overall process from end to end had multiple manual workloads  that the areas that were looked at to be automated through machine learning, would not help the client that much. However after visualizing the current work flow, identifying what are the manual bottlenecks and how they can be automated through simple automation processes, were identified that we can ensure the overall time taken can be cut down drastically and all this can be done whilst the data science aspect (which obviously takes time for training and implementation) is getting implemented. Hence the customer starts seeing benefit almost immediately.

In another project for an online transaction processing product where for the team to deliver a simple product feature to production after development completion, it was taking at least two months. They were looking at implementing sophisticated tools and revamping / rewriting the system to be cloud native etc… This was a massive project which potentially could have taken years. However when we really drill down to the actual root cause of the problem, we were able to identify that the challenge mainly was in two main areas of the system where any change done in any area of the system impacts these two key areas. So rather than trying to revamp, rewrite the complete system from scratch and bringing in new sophisticated tools up front, we were able to come up with an end state architecture, where the system would become a micro serviced, cloud native, with proper devops pipelines, and that could release features to production within couple of minutes. However more important than that, we built a simple road map where within a short period of time the product teams had the ability to safely release features within two weeks after development by bringing in QA automation to key areas and devops tooling with team collaborations to the overall project. This gave a huge boost to the product teams to release features rapidly. Later we started working towards the end state where the releases can be done within couple of minutes.

These are some example out of many which I has to get involved in, which shows that rather than trying to find technical solutions, we need to be able to understand what is the problem that our customers have, why are they looking at us to come up with a solution, and then only look at how best we can help the customer with solving their problem. Let’s face it, if the customers do not have a problem, they certainly do not need to spend on an architect. I believe “Just good enough architecture” is an approach we would need to take rather than “grand scale architecture” when coming up with solutions.

Concurrency vs. Parallelism

In a project that I was working on, we were discussing using “map-reduce” to process our application data faster and when we were discussing about leveraging current multi processors to process faster , I found there was some confusion about concurrency vs parallelism within the team. So I thought maybe I can explain the difference in a layman’s term so that all can grasp the idea.

Let us first look at what is concurrency

According to Wikipedia

In computer scienceconcurrency is the ability of different parts or units of a program, algorithm, or problem to be executed out-of-order or in partial order, without affecting the final outcome. This allows for parallel execution of the concurrent units, which can significantly improve overall speed of the execution in multi-processor and multi-core systems. In more technical terms, concurrency refers to the decomposability property of a program, algorithm, or problem into order-independent or partially-ordered components or units.[1]

Quite a mouthful right?

So what about parallelism or parallel computing

Parallel computing is a type of computation in which many calculations or the execution of processes are carried out simultaneously.[1] Large problems can often be divided into smaller ones, which can then be solved at the same time. There are several different forms of parallel computing: bit-levelinstruction-leveldata, and task parallelism. Parallelism has long been employed in high-performance computing, but has gained broader interest due to the physical constraints preventing frequency scaling.[2] As power consumption (and consequently heat generation) by computers has become a concern in recent years,[3] parallel computing has become the dominant paradigm in computer architecture, mainly in the form of multi-core processors.[4]

Again quite a mouthful … So what does this really mean in apples and oranges term?

Single Task – let’s say you go to the grocery store to buy an apple, and an apple only. This means you have a single task to do. 

Concurrency – let’s say you go to the same store, but now you want to buy apples, sugar, cream, milk , and flour to make an apple pie. So now you going to do multiple tasks, but you will select each item one by one at a given time.

Parallelism – Let’s say now, in order to make the same apple pie, you go to the store with couple of your friends and you give each one a set of items to buy. Now the items are being bought at the same time so your completion of the buying becomes much faster.

The following picture show how modern CPU would execute a concurrent or a parallel execution

Modern languages support to write applications using concurrency and support them being executed in parallel with multi core systems.

I have created a simple go application which creates go routines with and without channels that shows how concurrent tasks will run in multi core systems using parallelism. You can get the code @

https://github.com/IndikaMaligaspe/go-concurrnecy

Before we dive into code , we need to get an understanding of the difference between threads and Goroutine

ThreadsGoroutine
Have own execution stackHave own execution stac
Fixed stack space (around 1 MB)Variable stack space (starts @2 KB)
Managed by OSManaged by Go runtime
  
Threads vs Goroutines

Let’s look at some code snippets

package main

import (
	"fmt"

	"github.com/indikamaligaspe/go-concurrnecy/src/movies/channels"
	"github.com/indikamaligaspe/go-concurrnecy/src/movies/waitgroups"
)

func main() {
	fmt.Println("Starting With WAITGROUPS")
	waitgroups.StartWaitGroup()
	fmt.Println("Starting With CHANNELS")
	channels.StartChannels()
}

Using Channels

func StartChannels() {
	wg := &
sync.WaitGroup{}
	m := &sync.RWMutex{}
	cacheCh := make(chan movies.Movie)
	dbCh := make(chan movies.Movie)

	for i := 1; i < 10; i++ {
		id := rnd.Intn(10) + 1
		wg.Add(2)
		go func(id int, wg *sync.WaitGroup, m *sync.RWMutex, ch chan<- movies.Movie) {
			if movie, ok := queryCahce(id, m); ok {
				ch <- movie
			}
			wg.Done()
		}(id, wg, m, cacheCh)
		go func(id int, wg *sync.WaitGroup, m *sync.RWMutex, ch chan<- movies.Movie) {
			if movie, ok := queryDatabase(id, m); ok {
				m.Lock()
				chcache[id] = movie
				m.Unlock()
				ch <- movie
			}
			wg.Done()
		}(id, wg, m, dbCh)

		go func(cacheCh, dbCh <-chan movies.Movie) {
			select {
			case movie := <-cacheCh:
				fmt.Println("From Cache ->")
				fmt.Println(movie)
				<-dbCh
			case movie := <-dbCh:
				fmt.Println("From Database ->")
				fmt.Println(movie)
			}
		}(cacheCh, dbCh)
		time.Sleep(150 * time.Millisecond)
	}
	wg.Wait()
}

Without channels

func StartWaitGroup() {
	wg := &sync.WaitGroup{}
	m := &sync.RWMutex{}
	for i := 0; i < 10; i++ {
		fmt.Printf("Run %v : ", (i + 1))
		id := rnd.Intn(10) + 1
		wg.Add(2)
		go func(id int, wg *sync.WaitGroup, m *sync.RWMutex) {
			movie, ok := queryCahce(id, m)
			if ok {
				fmt.Println("From Cache")
				fmt.Println(movie)
			}
			wg.Done()
		}(id, wg, m)
		go func(id int, wg *sync.WaitGroup, m *sync.RWMutex) {
			movie, ok := queryDatabase(id, m)
			if ok {
				fmt.Println("From Database")
				fmt.Println(movie)
			}
			wg.Done()
		}(id, wg, m)
		time.Sleep(150 * time.Millisecond)
	}
	wg.Wait()
}

When executed we can see that the application runs utilizing all the cores in my notebook

Well , I hope this gave an idea about the difference and how Go handled parallelism with goroutines

Understanding the role of a Software Architect

According to Wikipedia the role of a Software Architect is defined as

Architects make high-level design choices based on their programming experience. An architect has thought through all the aspects of a software, just like an architect that builds a house. A construction architect knows where the ducts will be, where the electric connections will be and where the wall outlets will be. A design that a common person sees is just the walls and windows but a detailed design that is abstracted from the outsider are also present with the architect. In addition, the architect may sometimes propose technical standards, including coding standards, tools, or platforms.”

However according to my experience and according to actual software architects out there who have shared their experience; this is just a small portion of what goes into being a Software Architect.  A better analogy for me would be

An architect is a person who works with a diverse set of people both technical and non technical to guide a project / product or an organization to it’s business success using technology , engineering, collaboration, leadership, project management, standards,  and governance.”

According to above an architect plays a role of technical visionary, leader as well as people and process champion to ensure a project is successfully completed.

Well, what does these actually mean?

However when we look at the content that is out there, we mostly see the technical aspects as designing, modeling, deep technology knowledge , engineering principles etc… but if we look at above list, we are looking at more non technical then technical aspects.

So what is an architect expected to do?

To understand this, let’s understand the typical types of software architects that we can find in the industry. Though there are many, I can see three clear distinct types or architects,

  • Enterprise Architect – A strategic architect who looks at the overall organization’s business processes, people, information flow, and business & technical strategies. The main goal is to align an organization’s IT with business goals. An enterprise architect looks at the long term initiatives.
  • Solutions Architect – A tactical architect who looks at cross domain and cross functional system interactions such as frameworks, infrastructure, road maps, guidance, cross cutting process & governance, reuse and strategic solutions. The main goal is to look at an organizations product or services suite and help to implement strategic solutions across the board.
  • Application Architect – An operational architect who is a subject matter expert and will focus on single application stack. Integration Architect, Cloud Architect, Data Architect, Mobile Architect etc… An Application Architect would focus on components, maintainability, modules, classes, libraries, languages etc…

Most of the content available mainly details application architects, which is about the operational implementation and remaining highly technical. But the different between a senior engineer and an architect are those non technical skills, which I would coin as the essential skills needed for an architect to be successful.  

So to be an effective software architect, we need to understand the role of an architect and the key role non technical essential skills play in the role.

So to answer the question “What is the role of a software architect” ? the best answer that I can put out is , a person who guides a project or product from inception to closure with a diverse set of teams by using leadership, management and broad set of technical skills.

In my next article I will dive deeper into understanding what are the technical and non-technical duties of a software architect.

Building an IT Strategy

Developing an IT strategy may look as a daunting task for many IT leaders and even a defined IT strategy may not yield the right outcome. Many reason could contribute to a failed IT strategy but some of the main reasons being

  • IT leaders being pushed for IT strategies where the business itself may not be having a right strategy with clear vision, mission, goals, and objectives
  • A strategy being based on several tactics that keeps changing frequently
  • A strategy based on some external consultant with a 200 page document that nobody really follows.

 IT strategy should be based on answering one key question,

how will IT helps business success

So it is imperative that what defines as business success is identified up front. There are many tools in identifying business success, but one simple but yet powerful tool could be using Value Discipline model by Michael Treacy and Fred Wiesemara. The Value Disciple allows an organization to understand what is the one thing that will create a competitive advantage over others and what is it that an organization wants to be famous for. Another great feature about the Value Discipline is that in can be applied at any stage of organizations growth

Strategy

Strategy should define a vision of how the company will succeed, what are the goals to succeed. Basically how will the company win, by focusing on what?

Strategy is long term, will not, and should not change frequently

Strategic plan

Are the short term tactics that will allow us to get to the long term strategy? These are short lived, 3 months – 1 year. Regularly evaluated and changed to meet the current need and environment change.

IT strategy can be broken into three key areas DEMAND , CONTROL , SUPPLY.

Demand encapsulate the business demand to ensure business success and the IT contribution to that success

Control defines how will the organization ensure the strategic design is enforced correctly

Supply is how will IT evolve it’s capabilities to meet the demand

Demand (How will we win)Control (How will we ensure strategic design)Supply (How will IT evolve it’s capabilities)
Business Context (Value Discipline)IT PrinciplesIT Service
Business SuccessIT GovernanceArchitecture
Business CapabilitiesFinance ManagementPeople
IT contributionMetricsSourcing

The IT strategy document should be an 10 – 15 page document that encapsulate what is needed for the organization from the above table. Not all is needed , but we should pick what we need for our business.

Some highlights from above are

Demand

Business Context (Value Discipline) – What discipline should be our core discipline that we will never compromise for any reason. This is what will make us win the game of business

What will be the measurement of business success?

Business Capabilities – What are our core capabilities we need to have in order ensure that we meet business success (Cycle Time,  M&A, Efficiency , Process Improvement, Agility and Change, Transparency, Innovation , etc….)

IT contribution – How will IT contribute for business to win?

Control

Principles – 8 or 10 core principles that will govern all IT decisions which should be catered towards how IT will help business win. Two key questions to ask each time we make a decision (strategy moment)

  1. How do we succeed as a business
  2. How will IT help

Governance – What will govern every IT decision in every area?

Metrics – what are the KPI’ s that IT leaders need to monitor in order to ensure that the IT strategy is being followed and IT is delivering it’s promise to support business sucess

Supply

IT Services – what are the IT services that needs to be improved, altered or added to ensure that IT supports the business.

Architecture – How should the application , infrastructure , product architecture improve or will enhance the capabilities of the business.

People – What and where are the skill gaps that needs to fulfilled in order for IT to supply business success

A well laid out IT strategy and strategic plan will ensure that IT delivers on it’s promise to ensure business success.

I hope that above gave some insight to IT leaders on building an IT strategy that will work and has worked for me.

Software Engineering – Merge Sort

I recently had to a do an application that required me to sort a data set fast and efficiently. I opted to do a merge sort. Merge sort is a fast sorting algorithm which is always true with an average or worst case performance of O(n log n). What I really love about a merge sort is that it is a stable sorting algorithm.

After doing the sorting I realized that most people are unaware of how actually merge sort worked. Hence I decided to do this post so anyone can actually understand how merge sort worked behind the scene and give example codes using java and C of a merge sort on an integer array.

Merge Sort is a divide an concur sorting algorithm. The Array is divided repeatedly until we have only 2 arrays of only one element each. Then the elements in the two arrays are sorted and we work our way back up the hierarchy merging the arrays till we get a sorted array. You can get a very good description on the wiki site about merge sort.

If we take an array of 6 integers, say 5,12,3,3,9,18, we follow the process below

  1. Break the array in to two arrays -> 5,12,3 and 3,9,18
  2. Take each array and break it again -> 5 and 12,3
  3. Break the array till you have only 1 element each -> 12 and 3
  4. Now start sorting and merging – >3 and 12
    1. one layer up 3,12 and 1 -> 1,3,12
    2. one layer up 1,3,12 and 3,9,18 – > 1,3,3,9,12,18
  5. Now you have a sorted array

Let me explain this now with a Java code.
Note that I did not use any specific java syntax such as array.length to keep the code as generic as possible. The code methods are self explanatory.

class merge_sort
{

    public int[] split_merge(int [] mainArr , int start, int end)
    {
	if ((end - start) < 2) {
	    return mainArr;
	}

	int middle = (start + end) / 2;

	int[] A = new int[middle - start];
	int[] B = new int[end - middle];

	A = copy_array(mainArr, start, middle,A);
	B = copy_array(mainArr, middle, end ,B);

        //Recursively Call split_merge till we have an 
        //array with 1 element
	A = split_merge(A,0,middle);
	B = split_merge(B,0 ,(end-middle));
        
        //merge our way back one layer up always.
	mainArr = merge(mainArr, A, B, start, middle, end);
	return mainArr;
    }

    public int[] merge(int[] array, int[] A, int[] B, int start, int middle, int end)
    {
	int i = 0 , j = 0, k = 0;
        //Loop till end of main array and copy the sorted elements.
	for (k=0;k<(end-start);k++){
	    if ( (i < middle)  && (A[i] < B[j]) ){
		    array[k] = A[i];
		    i=i+1;
	    }else{
		    array[k] = B[j];
		    j=j+1;
	   }
	}

	return array;
	
    }

    public int[] copy_array(int[] A, int start, int end, int[] B)
    {
	int i =start, j =0;
        while (i < end) {
	    B[j] = A[i];
	    j+=1;
	    i+=1;
	}
	return B;
    }
    public  static void  main(String args[])
    {
	int mainArr[] = {2,3,5,1,6,4,10};
	int length = 7;

	for(int i =0 ; i <mainarr.length; i++){
="" system.out.format("unsorted="" array[%d]="%d" \n="" ",="" i="" ,="" mainarr[i]);="" }="" mainarr="new" merge_sort().split_merge(mainarr,0,length);="" for(int="" ;="" <mainarr.length;="" system.out.format("sorted="" <="" pre="">

Now let’s look at the same as implemented using C language. Again I have tried to make it language agnostic as possible.

#include <stdio.h>
#include <string.h>

int *merge_sort(int A[],int length);
int *copy_array(int *A,int start , int end , int *B);
int *split_merge(int *A, int start, int end);
int *merge(int *arr, int *A, int *B, int start,int middle, int end);


int* copy_array(int *A, int start, int end,int *B)
{
 int i , j;
  j = 0;
  for ( i = start; i< end; i++){
    B[j] = A[i];
    j = j +1;
  }
  return B;
}

int *merge(int *arr , int *A, int *B, int start, int middle, int end)
{
  int i = 0;
  int j = 0;
  int k = 0;

  for(k = 0; k < end ; k++){
    if((i < middle) && (A[i] < B[j])){
      arr[k] = A[i];
      i = i +1 ;
    }else {
      arr[k] = B[j];
      j = j +1;
    }  
  }
  return arr;
}

int *split_merge(int *arr, int start, int end)
{
  if((end-start) < 2)
    return arr;
  int k;
  
  int middle = (end -start) /2;
  int size_a = middle - start;
  int size_b = end - middle;
  
  int A[size_a];
  int B[size_b];
  int *_aptr = copy_array(arr , 0 , middle , A);
  int *_bptr = copy_array(arr, middle , end, B);

  _aptr = split_merge(_aptr,0,middle);
  _bptr = split_merge(_bptr,0, (end - middle));

  arr = merge(arr , _aptr , _bptr , start , middle, end);
  return arr;
  
}

int *merge_sort(int A[], int length)
{
  int start  = 0;
  int end = length; //I put this to match the Java Code
  A = split_merge(A,start,end);
  return A;
}


int main(int argc, char argv[])
{
  int A[] = {100,50,200,1000,18,5300};
  int length = 6;
  int *B;

  for ( i = 0;i < length ; i++){
    printf("Unsorted Array[%d] : %d \n",i , A[i]);
  }

  int *aptr = merge_sort(A , length );
  int i;
 
  for ( i = 0;i < length ; i++){
    printf("Sorted Array[%d] : %d \n",i , aptr[i]);
  }
  
  return 0;
}

So I hope that this will help you next time when you have to sort a data set and you will choose merge as an option to your application.

Connecting RabbitMQ with PIKA for 10000 EPS

Hey all , I know it has been a long time since I posted any articles on my site due to and extremely busy schedule. But I wanted to start again giving out my experience so that someone can benefit from that.

In the last week or so I have been tasked to create an event driven architecture to handle 10000+ EPS (events per second). The platform I chose  was to use message queue that will act as the main bus for all messages to be streams. For this purpose I have used RabbitMQ and pika (as the system is written in Python). One of the key challenges was to create an asynchronous publisher which had to be thread safe for 10000+ EPS. Searching over the net I could not find any good resource for this but found several supporting articles that helped me to build this out.

Following is a simple python pika publisher to publish messages asynchronously and in a thread safe environment.

import logging
import pika
import json
import time
from logging.handlers import RotatingFileHandler
from threading import Thread


class Publisher(Thread):

    def __init__(self, RABBITMQ_SETTINGS,LOG4PY_SETTINGS):
        Thread.__init__(self)       
        self.logger = logging.getLogger("Publisher.py")
        self.connection = None
        self.channel = None
        self._deliveries = []
        self._acked = 0
        self._nacked = 0
        self._message_number = 0
        self._stopping = False
        self.queue = 'alienvault_replicate'
        self.routing_key = 'alienvault_replicate'
        self.exchange = 'alienvault_replicate'
        self.message = None
        self.ready = False
        self._closing = False
        log4py_file  = LOG4PY_SETTINGS['log4py_file']
        log4py_log_level = LOG4PY_SETTINGS['log4py_log_level']
        self.PUBLISH_INTERVAL=0.1
        self.RABBITMQ_SETTINGS =RABBITMQ_SETTINGS

        if log4py_log_level == 'DEBUG':
           self.log_level = logging.DEBUG
        elif log4py_log_level == 'INFO': 
           self.log_level = logging.INFO
        elif log4py_log_level == 'WARN':
           self.log_level = logging.WARN
        elif log4py_log_level == 'ERROR': 
           self.log_level = logging.ERROR

        self.logger.setLevel(self.log_level)
        # create console handler and set level to debug
        rfh = RotatingFileHandler(filename=log4py_file, mode='a', maxBytes=100*1024*1024,backupCount=2)
        rfh.setLevel(self.log_level)
        # create formatter
        formatter = logging.Formatter('%(asctime)s - %(name)s - %(levelname)s - %(message)s')
    
        # add formatter to ch
        rfh.setFormatter(formatter)
    
        # add ch to logger
        self.logger.addHandler(rfh)
        
        amqp_url = 'amqp://'+self.RABBITMQ_SETTINGS['user']+':'+self.RABBITMQ_SETTINGS['passwd']+'@'+self.RABBITMQ_SETTINGS['host']+':'+str('5672')+'/%2F'
        self._url = amqp_url
        
    def is_ready(self):
        return self.ready
        
    def set_message(self,message):
        self.message = message
        self.logger.info('Message set to publish to {0}'.format(self.message))
    
    
    def connect(self):
        self.logger.info('Connecting to %s', self._url)
        return pika.SelectConnection(pika.URLParameters(self._url),
                                     self.onconnection_open)
        
    def close_connection(self):
        self.logger.info('Closing connection')
        self._closing = True
        self.connection.close()

    def add_onconnection_close_callback(self):
        self.logger.info('Adding connection close callback')
        self.connection.add_on_close_callback(self.onconnection_closed)

    def onconnection_closed(self, connection, reply_code, reply_text):

        self.channel = None
        if self._closing:
            self.connection.ioloop.stop()
        else:
            self.logger.warning('Connection closed, reopening in 5 seconds: (%s) %s',
                           reply_code, reply_text)
            self.ready = False                   
            self.reconnect()


    def onconnection_open(self, unusedconnection):
        self.logger.info('Connection opened')
        self.add_onconnection_close_callback()
        self.openchannel()

    def reconnect(self):
        self.connection.ioloop.stop()
        self.connection = self.connect()
        self.connection.ioloop.start()

    def add_onchannel_close_callback(self):
        self.logger.info('Adding channel close callback')
        self.channel.add_on_close_callback(self.onchannel_closed)

    def onchannel_closed(self, channel, reply_code, reply_text):
        self.logger.warning('Channel was closed: (%s) %s', reply_code, reply_text)
        if not self._closing:
            self.connection.close()

    def onchannel_open(self, channel):
        self.logger.info('Channel opened')
        self.channel = channel
        self.add_onchannel_close_callback()
        self.setup_exchange(self.exchange)

    def setup_exchange(self, exchange_name):
        self.logger.info('Declaring exchange %s', exchange_name)
        self.channel.exchange_declare(self.on_exchange_declareok,
                                       exchange_name)

    def on_exchange_declareok(self, unused_frame):
        self.logger.info('Exchange declared')
        self.setup_queue(self.queue)

    def setup_queue(self, queue_name):
        self.logger.info('Declaring queue %s', queue_name)
        self.channel.queue_declare(self.on_queue_declareok, queue_name,durable=True)

    def on_queue_declareok(self, method_frame):
        self.logger.info('Binding %s to %s with %s',
                    self.exchange, self.queue, self.routing_key)
        self.channel.queue_bind(self.on_bindok, self.queue,
                                 self.exchange, self.routing_key)


    def publish_message(self):
        if self._stopping:
            return
        if self.message == None:
            return

        try:
            properties = pika.BasicProperties(delivery_mode = 1)
    
            self.channel.basic_publish(self.exchange, self.routing_key,
                                        self.message,
                                        properties)
            self.logger.info('Published message # %i', self._message_number)
        except Exception as err:
            import trace
            self.logger.info("Error in sending message ... {0}".format(err.message))
            self.ready = False

    def start_publishing(self):
        self.logger.info('Issuing consumer related RPC commands')
        self.ready = True
        self.publish_message()

    def on_bindok(self, unused_frame):
        self.logger.info('Queue bound')
        self.start_publishing()

    def closechannel(self):
        self.logger.info('Closing the channel')
        if self.channel:
            self.channel.close()

    def openchannel(self):
        self.logger.info('Creating a new channel')
        self.connection.channel(on_open_callback=self.onchannel_open)

    def run(self):
        self.connection = self.connect()
        self.connection.ioloop.start()


    def stop(self):
        self.logger.info('Stopping')
        self._stopping = True
        self.closechannel()
        self.close_connection()
        self.connection.ioloop.start()
        self.logger.info('Stopped')

if __name__ == '__main__':
    try:
        RABBITMQ_SETTINGS = {"user":"user","passwd":"pw","host":"xxx.xxx.xxx.xxx"}
        LOG4PY_SETTINGS = {"log4py_file":"./log4py.log","log4py_log_level":"INFO"}
        
        publisher = Publisher(RABBITMQ_SETTINGS,LOG4PY_SETTINGS)
        publisher.start()
        for i in range(1 , 100000):
            message = '{"message":"Hello Fellasss...."'+str(i)+'}'
            publisher.set_message(message)
            while not publisher.is_ready():
                time.sleep(.001)
            publisher.publish_message()
        publisher.stop()    
    except KeyboardInterrupt:
        publisher.stop()