Using Theme to supercharge React Projects : A Quick Guide

Let’s talk theme files—the secret sauce to keep your React project’s styling clean, scalable, and, well, just plain fun. Imagine this: you’re neck-deep in a React app, and your styling is scattered across components. One tweak to your color palette, and you’re knee-deep in dozens of CSS changes. Enter the magic of theme files. They not only save you from this chaos but supercharge your workflow with flexibility, consistency, and ease.

But why should you care about using a theme file for styling in React? Here’s the thing: it’s not just about keeping your code neat—it’s about creating a scalable system where tweaking one line in a theme file can change the look of your entire app. It’s like being the architect of a universe, where every component dances to the tune of your style variables.

Why Use a Theme File?

To be honest, building an app isn’t just about code; it’s about design. You want a sharp, clean interface. But what happens when your app grows and you need to make global changes? Hunting down individual styles is a nightmare. Enter the theme file—a single source of truth for all your styling needs.

Think of it as the control center for your app’s appearance. You define variables like colors, fonts, margins, and more in a centralized file. Want to update the entire app’s primary color? Change one variable. Done. It’s that simple.

Let’s build a tiny project that shows how to create and use a theme file to style React components. In this example, we’ll show how to define a theme file and use it to control the styling of your components like a boss.

  • Setting Up the Theme File

First, let’s create a theme file. In your project, make a theme.js file that looks something like this:

// theme.js
export const theme = {
  colors: {
    primary: '#3498db',
    secondary: '#2ecc71',
    background: '#f5f5f5',
    text: '#333333',
  },
  fontSizes: {
    small: '12px',
    medium: '16px',
    large: '24px',
  },
};

This theme file is your styling power station. You control everything from colors to fonts here.

  • Using the Theme in a Styled Component

Now, let’s use this theme in a React component using styled-components:

// MyButton.js
import styled from 'styled-components';
import { theme } from './theme';

const Button = styled.button`
  background-color: ${theme.colors.primary};
  color: ${theme.colors.text};
  padding: 10px 20px;
  font-size: ${theme.fontSizes.medium};
  border: none;
  border-radius: 5px;
  cursor: pointer;

  &:hover {
    background-color: ${theme.colors.secondary};
  }
`;

export default Button;

our button now responds to the colors and font sizes from the theme file. Want to make it a little edgier? Change the variables in your theme.js file and watch your app transform.

  • Using the Component

Finally, let’s use this component in your app:

// App.js
import React from 'react';
import Button from './MyButton';

function App() {
  return (
    <div style={{ backgroundColor: '#f5f5f5', padding: '20px' }}>
      <h1>Styled with Theme Files!</h1>
      <Button>Click Me</Button>
    </div>
  );
}

export default App;

Now, your app pulls its styling from the theme file. Update the theme, and everything updates like magic. Consistency? Check. Flexibility? You got it.

Final thoughts

So, why go through the hassle of using theme files? Because it’s not a hassle—it’s freedom. As your app scales, having a single place to manage your style variables makes development faster, more fun, and way less stressful. Plus, your app will thank you for the consistent, polished look.

Ready to try it out? Go ahead, give theme files a whirl, and watch your React project take styling to the next level!
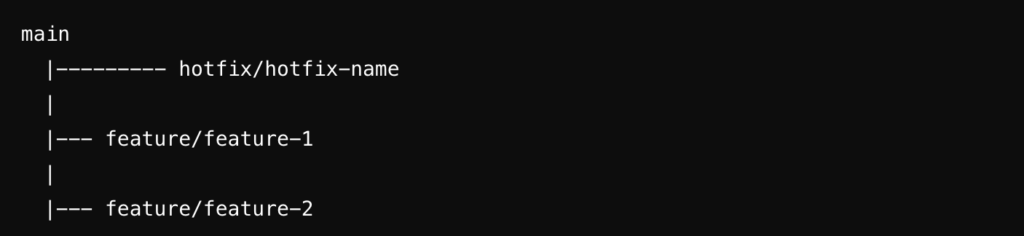
Git strategy for different projects

Different organization have their own software products and engineering practices to support the development. Having a good repository management is key to having a great engineering process. However, in my experience in consulting organizations in digitalizing and adopting robust engineering practices, I have seen teams struggling to find the right repository management practice for their project or product structure. In this article I will try to provide recommended git practices for four common types of agile projects: internal projects with multiple teams, external client projects, multi-client products with different versions, and SaaS products with a single codebase used by multiple clients.

  • Internal Project with Multiple Development Teams
    • Project Characteristics:
      • Client: Single internal client.
      • Teams: Multiple development teams.
      • Release Strategy: Planned production releases, QA releases every sprint.
    • Recommended Git Practices:
      • Branching Strategy:
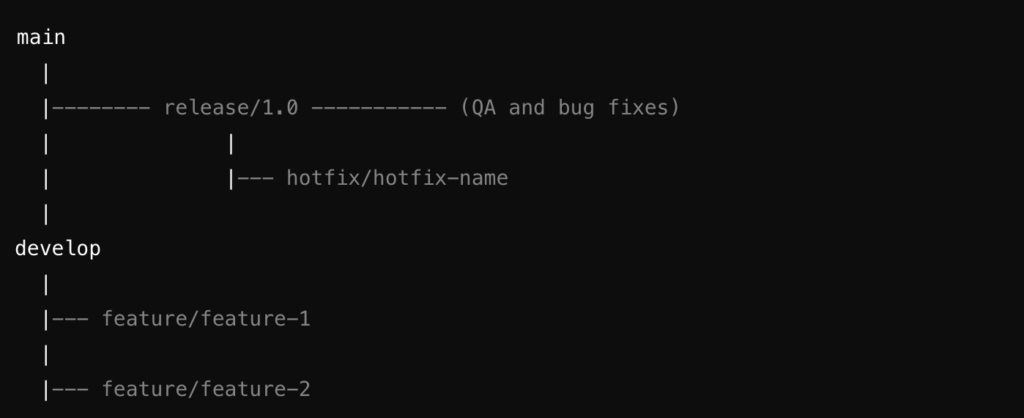
        • Main Branch: Use 'main' or master‘ as the stable branch where the latest production-ready code resides.
        • Development Branch: Create a ‘develop‘ branch where all new features, improvements, and bug fixes are merged before they are considered for production.
        • Feature Branches: Each team should work on feature branches (‘feature/feature-name‘) derived from the ‘develop‘ branch. This isolates feature development and minimizes integration conflicts.
        • Release Branches: Before each planned release, create a ‘release/release-version‘ branch from ‘develop‘. This branch is used for final QA, minor fixes, and preparing the code for production.
      • Merging Strategy:
        • Feature branches should be merged into ‘develop‘ via pull requests (PRs). This ensures code reviews and testing are part of the process.
        • Once a release branch is created, only critical bug fixes should be merged into it, usually via hotfix branches (‘hotfix/hotfix-name‘) if necessary.
        • After the production release, the ‘release‘ branch should be merged into both main and develop to ensure all changes are captured.
      • Releasing Strategy:
        • Schedule regular merges from the ‘release‘ branch into ‘main‘ to mark official production releases.
        • Use Git tags to mark specific releases (v1.0.0, v1.1.0) on the ‘main‘ branch for easy reference and rollback if needed.
  • main: Stable, production-ready code.
  • develop: Integration branch for all features.
  • feature/feature-x: Individual branches for each feature.
  • release/release-version: Preparation for release, includes QA and final bug fixes.
  • hotfix/hotfix-name: For urgent fixes that need to be applied after a release.
  • External Client Project Developed by One Team
    • Project Characteristics:
      • Client: Single external client.
      • Teams: One development team.
      • Release Strategy: Immediate releases after QA completion and critical bug resolution.
    • Recommended Git Practices:
      • Branching Strategy:
        • Main Branch: The ‘main‘ branch should be kept production-ready at all times, as releases are frequent and driven by immediate needs.
        • Feature Branches: Use ‘feature/feature-name‘ branches for each new feature or bug fix.
        • Hotfix Branches: Given the nature of immediate releases, hotfix branches (‘hotfix/hotfix-name‘) should be used for critical issues identified after a release.
      • Merging Strategy:
        • Merge completed feature branches directly into ‘main‘ via PRs after thorough QA. The simplicity of the project structure allows for this direct approach.
        • Hotfix branches should be merged into ‘main‘ immediately after the issue is resolved and tested.
      • Releasing Strategy:
        • Releases are tagged directly on the main branch as soon as they pass QA (v1.0.1, v1.0.2).
        • Consider using lightweight tags for interim builds or QA releases, and annotated tags for official client releases.
  • main: Production-ready, frequently updated branch.
  • feature/feature-x: Feature development branches.
  • hotfix/hotfix-name: Branches created to fix critical issues immediately after a release.
  • Multi-Client Product with Different Versions
    • Project Characteristics:
      • Clients: Multiple clients on different versions of the product.
      • Teams: Several teams working on various product areas.
      • Release Strategy: Versioned releases tailored to individual clients.
    • Recommended Git Practices:
      • Branching Strategy:
        • Main Branch: Use the ‘main‘ branch as the latest stable version of the product.
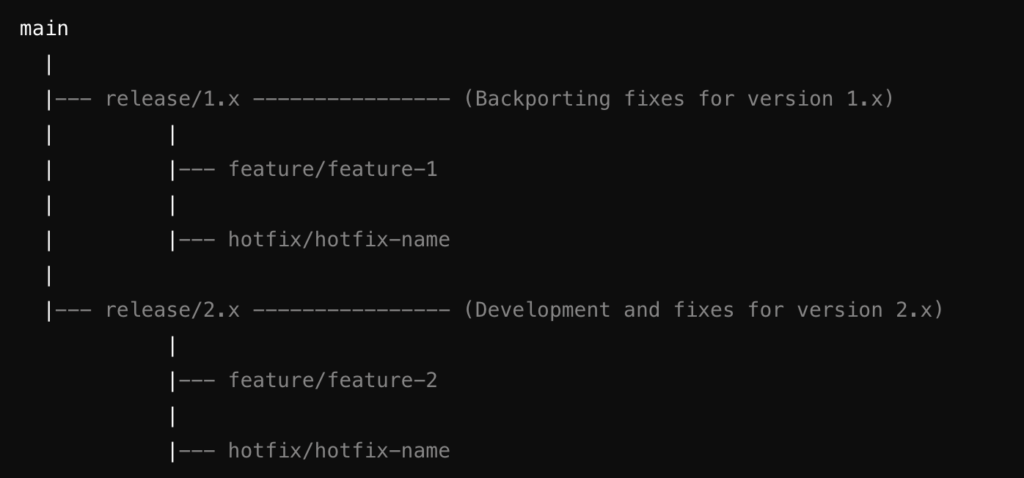
        • Version Branches: Maintain long-lived branches for each major version (‘release/1.x, release/2.x‘). These branches allow you to backport fixes or enhancements to clients on older versions.
        • Feature Branches: Each new feature or improvement should be developed in a feature branch (‘feature/feature-name‘) from the target version branch.
      • Merging Strategy:
        • Features are merged into the respective version branch via PRs. If a feature is applicable to multiple versions, cherry-pick the commits across the relevant branches.
        • Hotfixes should be merged into the version branch and, if necessary, forward-ported to newer versions.
      • Releasing Strategy:
        • Tag releases on the appropriate version branch (v1.5.0, v2.3.0) before deploying to clients.
        • Use tags and branches to manage client-specific customizations, if necessary, by creating branches like ‘client/client-name‘ from the relevant version branch.
  • main: Latest stable version of the product.
  • release/1.x, release/2.x: Long-lived branches for different versions of the product.
  • feature/feature-x: Features developed for specific versions.
  • hotfix/hotfix-name: Hotfixes applied to specific versions.
  • SaaS Product with a Single Codebase for Multiple Clients
  • Project Characteristics:
    • Clients: Multiple clients using the same codebase.
    • Teams: Multiple teams contributing to the product.
    • Release Strategy: Continuous deployment with feature toggles or configurations for client-specific customizations.
  • Recommended Git Practices:
    • Branching Strategy:
      • Main Branch: Use ‘main‘ for the latest production-ready code. Given the continuous deployment model, the main branch should always be stable and ready for release.
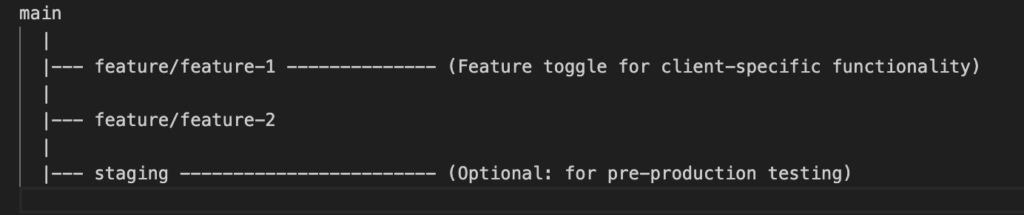
      • Feature Branches: Develop features in isolated ‘feature/feature-name‘ branches, using feature toggles or flags to manage client-specific functionality.
      • Environment Branches: Optionally, use branches like ‘staging‘ or ‘pre-production‘ for testing in environments that mimic production.
    • Merging Strategy:
      • Merge feature branches into main after testing and code review, ensuring all feature toggles or client configurations are correctly implemented.
      • Use environment branches for additional testing stages if your deployment pipeline requires it.
    • Releasing Strategy:
      • Deploy directly from the ‘main‘ branch using automated CI/CD pipelines.
      • Tag major releases for easier rollback (v3.0.0, v3.1.0), and use feature flags to manage rollout across different clients.
  • main: Single codebase ready for production deployment.
  • feature/feature-x: Branches for feature development, often managed with feature toggles.
  • staging: Optional branch for additional testing before production deployment.

General Git Best Practices

  • Commit Often and Meaningfully: Make frequent, small commits with descriptive messages to improve traceability and collaboration.
  • Use Pull Requests: Even for small teams, PRs encourage code reviews and discussion, leading to higher code quality.
  • Rebase with Caution: While rebasing keeps a linear commit history, avoid it on public branches to prevent conflicts.
  • Automate Testing: Integrate automated tests into your Git workflow to catch issues early and maintain code quality.
  • Documentation: Maintain clear documentation on your branching and release strategy to ensure all team members follow the same practices.

Well I hope above gives teams trying set up a repository management strategy to match their project / product, some guidelines.

Advance Javascript : Lazy Loading

In my previous articles I explained optimization patterns such as deboucing and throttling, in this article let’s do a deep dive into lazy loading , which defers the loading of resources until they are actually needed. This article will walk you through a simple example of implementing lazy loading in a TypeScript web application.

What is Lazy Loading?

Lazy loading is a design pattern commonly used to delay the initialization of objects until the point at which they are needed. In the context of web development, this often refers to loading resources like images, scripts, or modules only when they are required, rather than at the start of the application. This can significantly reduce initial load times and improve overall performance.

Project Overview

We will create a web page with a button. When the button is clicked, a module containing a heavy computation function will be loaded and executed. This example uses TypeScript and native ES modules to achieve lazy loading.

Setting Up the Project

  • Project Structure
lazy-loading-example/
├── dist/
│   ├── index.html
│   ├── app.js
│   └── lazyModule.js
├── src/
│   ├── index.html
│   ├── app.ts
│   └── lazyModule.ts
├── tsconfig.json
└── package.json
  • Initialize the Project
npm install typescript --save-dev
npx tsc --init
  • Configure TypeScript

Edit ‘tsconfig.json ‘to target ES6 and use ESNext modules:

{
  "compilerOptions": {
    "target": "es5",
    "module": "esnext",
    "outDir": "./dist",
    "strict": true,
    "esModuleInterop": true,
    "skipLibCheck": true,
    "forceConsistentCasingInFileNames": true
  },
  "include": ["src/**/*"]
}

Writing the Code

  • Create HTML File

Create ‘src/index.html‘ with a button and script tag

<!DOCTYPE html>
<html lang="en">
<head>
  <meta charset="UTF-8">
  <meta name="viewport" content="width=device-width, initial-scale=1.0">
  <title>Lazy Loading Example</title>
</head>
<body>
  <h1>Lazy Loading Example</h1>
  <button id="loadButton">Load Module</button>
  <script type="module" src="./app.js"></script>
</body>
</html>
  • Create Lazy Module

Create ‘src/lazyModule.ts‘ which contains a heavy task function:

export const performHeavyTask = () => {
  console.log('Performing a heavy task...');
  // Simulate a heavy task
  for (let i = 0; i < 1e7; i++) {}
  console.log('Heavy task completed.');
};
  • Create Main Application File

Create ‘src/app.ts‘ to handle button click and load the module

const loadButton = document.getElementById('loadButton') as HTMLButtonElement;

loadButton.addEventListener('click', async () => {
  const module = await import('./lazyModule.js');
  module.performHeavyTask();
});

Compile and Run

  • Compile the TypeScript files
npx tsc
  • Serve the Application

Use a static file server to serve the files. Here’s a quick way to do it using ‘http-server

npm install -g http-server
http-server dist
  • Open in Browser

Open your browser and navigate to http://localhost:8080 (or the port http-server provides). Click the “Load Module” button to see the lazy loading in action. The performHeavyTask function from lazyModule will be dynamically imported and executed, demonstrating lazy loading.

Conclusion

Lazy loading is an effective way to optimize web application performance by loading resources only when they are needed. In this example, we’ve seen how to implement lazy loading in a TypeScript web application using native ES modules. This technique can be extended to other resources like images and scripts to further enhance your application’s performance.

By adopting lazy loading, you can ensure that your web applications are both efficient and responsive, providing a better experience for your users

For complete source – https://github.com/IndikaMaligaspe/advance-javascrips/tree/master/topics/performance-optimization

Advance Javascript: Throttling

In my previous article I went through a performance optimization strategy called debouncing, in this article let’s go through an effective technique to manage the frequency of function execution – throttling. We’ll explore what throttling is, why it’s useful, and how to implement it with examples from both a console application and a web application using TypeScript.

What is Throttling?

Throttling is a technique used to ensure that a function is executed at most once in a specified period. This is particularly useful in scenarios where an event fires multiple times in quick succession, like keystrokes, window resizing, or scroll events. By throttling, we can control the execution frequency of a function, improving performance and user experience.

Why Use Throttling?

Imagine a scenario where you have a function that updates the UI based on user scroll events. Without throttling, the function could be called numerous times per second, potentially degrading performance. Throttling ensures that the function is called at most once every specified period, reducing the workload and improving efficiency.

Throttling in a Console Application

Let’s start with a simple example in a console application using Node.js. We’ll create a throttled function that logs a message only once every 2 seconds while the user types.

TypeScript Example:

import readline from 'readline';

type Throttle = <T extends(...args:any[]) => void> (func:T, limit: number) => (...args: Parameters<T>) => void;

const throttle : Throttle = (func, limit) => {
    let lastFunc: NodeJS.Timeout | undefined;
    let lastRan: number;

    return function (this: unknown, ...args: Parameters<typeof func>){
        const context = this;
        if(!lastRan) {
            func.apply(context, args);
            lastRan = Date.now();
        } else {
            if(lastFunc) clearTimeout(lastFunc);
            lastFunc = setTimeout(() => {
             if((Date.now() - lastRan >= limit)){
                func.apply(context, args);
                lastRan = Date.now();
             }
            }, limit);
        }
    };
}

const rl = readline.createInterface({
    input: process.stdin,
    output: process.stdout
});

const handleKeystroke = throttle((input: string) => {
    console.log('Keystroke is :', input.trim())
}, 2000);

console.log(' Start Typing :');
rl.on('line', handleKeystroke)

In this example, the handleKeystroke function logs the input at most once every 2 seconds, regardless of how fast you type and press Enter.

Throttling in a Web Application

Now, let’s look at an example in a web application. We’ll throttle a function that handles input events on a search field, ensuring the search function is only called at most once every 300 milliseconds.

HTML:

<!DOCTYPE html>
<html lang="en">
<head>
  <meta charset="UTF-8">
  <meta name="viewport" content="width=device-width, initial-scale=1.0">
  <title>Throttling Example</title>
</head>
<body>
  <input type="text" id="searchInput" placeholder="Type to search..." />
  <script src="app.js"></script>
</body>
</html>

TypeScript (app.ts):

First, install TypeScript and configure it if you haven’t already

npm install typescript --save-dev
npx tsc --init

Now, here’s the TypeScript code for the web application

const throttle = <T extends (...args: any[]) => void>(func: T, limit: number) => {
  let lastFunc: ReturnType<typeof setTimeout>;
  let lastRan: number | undefined;
  return function (this: unknown, ...args: Parameters<T>) {
    const context = this;
    if (!lastRan) {
      func.apply(context, args);
      lastRan = Date.now();
    } else {
      if (lastFunc) clearTimeout(lastFunc);
      lastFunc = setTimeout(() => {
        if ((Date.now() - lastRan!) >= limit) {
          func.apply(context, args);
          lastRan = Date.now();
        }
      }, limit - (Date.now() - lastRan!));
    }
  };
};

const handleInput = throttle((event: Event) => {
  const target = event.target as HTMLInputElement;
  console.log('Search query:', target.value);
}, 300);

const searchInput = document.getElementById('searchInput') as HTMLInputElement;
searchInput.addEventListener('input', handleInput);

Explanation

  • Type Declaration
    • Throttle‘: A type for the throttle function which ensures the input function func is only called once every limit milliseconds.
  • Throttle Function
    • throttle‘ takes a function func and a limit limit in milliseconds.
    • Uses ‘lastFunc‘ to store the timeout ID and ‘lastRan‘ to store the timestamp of the last execution.
    • Checks if ‘lastRan‘ is undefined (first run) and executes ‘func‘.
    • If not the first run, clears any previous timeout and sets a new timeout to execute func after the remaining time until ‘limit‘ has passed
  • HTML and TypeScript Integration
    • The input field in the HTML triggers the throttled ‘handleInput‘ function
    • The ‘handleInput‘ function logs the search query at most once every 300 milliseconds

Conclusion

Throttling is a powerful technique to control the execution frequency of functions in JavaScript, ensuring they are called at most once in a specified period. By applying throttling in both console and web applications, you can significantly improve performance and user experience. Whether you’re managing user input, scroll events, or resize events, throttling ensures that your functions are executed efficiently and only when necessary.

For complete source – https://github.com/IndikaMaligaspe/advance-javascrips/tree/master/topics/performance-optimization

Advance Javascript: Debouncing

When writing applications in javascript, we rarely consider performance, however as the user base or application usage increases performance becomes a huge bottleneck for growth. One powerful technique to manage the frequency of function execution is debouncing. In this post, we’ll explore what debouncing is, why it’s useful, and how to implement it with examples from both a console application and a web application.

What is Debouncing?

Debouncing is a technique used to ensure that a function is only executed after a certain amount of time has passed since it was last invoked. This is particularly useful in scenarios where an event fires multiple times in quick succession, like keystrokes, window resizing, or scroll events. By debouncing, we can limit the number of times the function is called, improving performance and user experience.

Why Use Debouncing?

Imagine a search input field that sends a request to a server every time a user types a character. Without debouncing, a request would be sent for every keystroke, potentially overwhelming the server with unnecessary requests. Debouncing ensures that the request is only sent after the user has stopped typing for a specified period, reducing the number of requests and improving efficiency.

Example 1: Console application

Let’s start with a simple example in a console application using Node.js. We’ll create a debounced function that logs a message only after the user stops typing for 1 second.

First, install the ‘readline‘ module if you haven’t already:

npm install @types/node

Here’s the TypeScript code:

import * as readline from 'readline';

// Declare debounce type separately
type Debounce = <T extends (...args: any[]) => void>(func: T, wait: number) => (this: unknown, ...args: Parameters<T>) => void;

const debounce: Debounce = (func, wait) => {
  let timeout: NodeJS.Timeout | undefined;
  return function (this: unknown, ...args: Parameters<typeof func>) {
    const context = this;
    if (timeout) clearTimeout(timeout);
    timeout = setTimeout(() => func.apply(context, args), wait);
  };
}

const rl = readline.createInterface({
  input: process.stdin,
  output: process.stdout
});

const handleInput = debounce((input: string) => {
  console.log('Executing command:', input.trim());
}, 1000);

console.log('Type a command and press Enter:');
rl.on('line', handleInput);

In the above example the the ‘handleInput’ function gets called only after 1 second after the user stops typing, allowing the application to reduce the unnecessary executions each time the user is typing.

Now, let’s look at an example in a web application. We’ll debounce a function that handles input events on a search field, ensuring the search function is only called after the user stops typing for 300 milliseconds.

HTML:

<!DOCTYPE html>
<html lang="en">
<head>
  <meta charset="UTF-8">
  <meta name="viewport" content="width=device-width, initial-scale=1.0">
  <title>Debouncing Example</title>
</head>
<body>
  <input type="text" id="searchInput" placeholder="Type to search..." />
  <script src="app.js"></script>
</body>
</html>

JavaScript (app.js):

function debounce(func, wait) {
  let timeout;
  return function (...args) {
    const context = this;
    clearTimeout(timeout);
    timeout = setTimeout(() => func.apply(context, args), wait);
  };
}

const handleInput = debounce((event) => {
  console.log('Search query:', event.target.value);
}, 300);

document.getElementById('searchInput').addEventListener('input', handleInput);

Conclusion:

Debouncing is a simple yet powerful technique to control the execution frequency of functions in JavaScript. By applying debouncing in both console and web applications, you can significantly improve performance and user experience. Whether you’re managing user input, scroll events, or resize events, debouncing ensures that your functions are executed efficiently and only when necessary. In my next article I will go into debouncing in a react application using useCallback hook and lodash ‘debounce’

For complete source – https://github.com/IndikaMaligaspe/advance-javascrips/tree/master/topics/performance-optimization

Authentication Middleware with JWT in Node.js

In any website or web application, ensuring that users are who they claim to be and protecting sensitive data from unauthorized access is crucial . One popular method for implementing authentication in Node.js is using JSON Web Tokens (JWT) and custom middleware. In this article, lets explore how to create a middleware that authenticates users using JWT.

What is JWT?

JWT (JSON Web Token) is an open standard for securely transmitting information between parties as a JSON object. This information is digitally signed, ensuring its integrity and authenticity. JWT is commonly used for authentication and authorization purposes.

A JWT is composed of three parts:

  • Header: Contains metadata about the token, such as the type of token (JWT) and the signing algorithm used (e.g., HMAC SHA256).
  • Payload: Contains the claims, which are statements about an entity (typically, the user) and additional data. There are three types of claims: registered, public, and private.
    • Registered claims: Predefined claims like iss (issuer), exp (expiration time), sub (subject), and aud (audience).
    • Public claims: Custom claims defined, such as user roles.
    • Private claims: Claims agreed upon between parties using the JWT.
  • Signature: Used to verify the token’s integrity and authenticity. It is created by encoding the header and payload using Base64Url, concatenating them with a dot, and signing the resulting string with a secret key using the specified algorithm.

A JWT typically looks like:

eyJhbGciOiJIUzI1NiIsInR5cCI6IkpXVCJ9.eyJzdWIiOiIxMjM0NTY3ODkwIiwibmFtZSI6IkpvaG4gRG9lIiwiaWF0IjoxNTE2MjM5MDIyfQ.SflKxwRJSMeKKF2QT4fwpMeJf36POk6yJV_adQssw5c

Setting Up the Project

Before we dive into the middleware, let’s set up a basic Node.js project with Express.

  • Initialize a new Node.js project:
mkdir auth-middleware
cd auth-middleware
npm init -y
  • Install necessary packages:
npm install express jsonwebtoken body-parser
  • Create a basic Express server:
// server.js
const express = require('express');
const bodyParser = require('body-parser');
const jwt = require('jsonwebtoken');

const app = express();
app.use(bodyParser.json());

const PORT = process.env.PORT || 3000;

app.listen(PORT, () => {
    console.log(`Server is running on port ${PORT}`);
});

Creating the Middleware

Next lets create the middleware that will intercept and handle authentication in our application

  • Create the middleware:
// middleware/auth.js
const jwt = require('jsonwebtoken');

const authenticateToken = (req, res, next) => {
    const authHeader = req.headers['authorization'];
    const token = authHeader && authHeader.split(' ')[1];

    if (token == null) return res.sendStatus(401); // If no token, unauthorized

    jwt.verify(token, process.env.ACCESS_TOKEN_SECRET, (err, user) => {
        if (err) return res.sendStatus(403); // If invalid token, forbidden
        req.user = user;
        next(); // Proceed to the next middleware or route handler
    });
};

module.exports = authenticateToken;
  • Protecting routes using the middleware:
// server.js
const express = require('express');
const bodyParser = require('body-parser');
const jwt = require('jsonwebtoken');
const authenticateToken = require('./middleware/auth');

const app = express();
app.use(bodyParser.json());

const PORT = process.env.PORT || 3000;

// Dummy user for demonstration
const user = { id: 1, username: 'testuser' };

// Route to login and generate a token
app.post('/login', (req, res) => {
    const username = req.body.username;

    if (username !== user.username) {
        return res.status(403).send('User not found');
    }

    const accessToken = jwt.sign(user, process.env.ACCESS_TOKEN_SECRET);
    res.json({ accessToken });
});

// A protected route
app.get('/protected', authenticateToken, (req, res) => {
    res.send('This is a protected route');
});

app.listen(PORT, () => {
    console.log(`Server is running on port ${PORT}`);
});

Generating and Verifying JWTs

When a user logs in, for us to verify the user, we need to generate the JWT and verify that user is having a valid token

  • Generate a JWT:

In the /login route, we create a token using ‘jwt.sign()

const accessToken = jwt.sign(user, process.env.ACCESS_TOKEN_SECRET);
  • Verify a JWT:

In the middleware, we use ‘jwt.verify()‘ to check the token’s validity

jwt.verify(token, process.env.ACCESS_TOKEN_SECRET, (err, user) => {
    if (err) return res.sendStatus(403);
    req.user = user;
    next();
});

Environment Variables

In order to keep our security keys for access token generation hidden from public , lets store our key in a .env file in the server and load that in our application when needed

Create a ‘.env‘ file in the project root:

ACCESS_TOKEN_SECRET=secret_key

Load these variables in the application using ‘dotenv‘:

npm install dotenv
// server.js
require('dotenv').config();

Conclusion

By implementing custom middleware with JWT, we can secure our Node.js applications with a robust authentication mechanism. This approach ensures that only authenticated users can access protected routes, enhancing the overall security of our application.

The Power of WebSockets and Socket.io in Real-time Applications

In the age of real-time applications, our ability to provide instant updates to users is a significant advantage. Traditional HTTP protocols are not designed for persistent, real-time communication, which is where WebSockets come into play. WebSockets allow for full-duplex communication channels over a single TCP connection, making them ideal for applications requiring constant data exchange without the overhead of repeatedly opening and closing connections.

Socket.io, a JavaScript library, builds on top of WebSockets and offers additional capabilities like automatic reconnection, multiplexing, and broadcasting, making real-time application development more accessible and robust.

A Collaborative Google Sheets-Like Application

I recently worked on an exciting project where we developed a Google Sheets-like application for a logistic industry company, allowing multiple users to collaborate in real-time. The core feature was that any update to a cell would be instantly visible to all users. Moreover, when a user started editing a cell, it would be highlighted and locked for other users until the editing was complete.

Key Features Implemented:

  • Real-time Cell Updates: As one user updates a cell, all other users see the changes instantly.
  • Cell Locking Mechanism: The cell being edited is highlighted and locked for other users, preventing simultaneous edits.
  • Color Change Notification: The cell being edited changes color, indicating another user is working on it.

To achieve these features, we utilized WebSockets and Socket.io for real-time communication between the server and clients.

Usage of WebSockets and Socket.io

As WebSockets provide a persistent connection between the client and server, enabling real-time data exchange with minimal latency. This was crucial for an applications like ours where delays in updates could lead to conflicts or confusion among users.

Socket.io simplifies WebSocket implementation by handling the complexities of real-time communication, such as reconnection, event handling, and cross-browser compatibility. It also supports additional features like rooms and namespaces, which can be used to segment communication to specific groups of users.

Simplified Backend Code Implementation

Below is a simplified version of our backend code using Node.js and Socket.io

const express = require('express');
const http = require('http');
const socketIo = require('socket.io');

const app = express();
const server = http.createServer(app);
const io = socketIo(server);

let sheetsData = {}; // A placeholder for our sheet data storage, once completed this will be sent to our document db.

io.on('connection', (socket) => {
    console.log('A user connected');

    // Handling cell update
    socket.on('cellUpdate', (data) => {
        const { sheetId, cellId, newValue } = data;

        // Update the cell in our data store
        if (!sheetsData[sheetId]) {
            sheetsData[sheetId] = {};
        }
        sheetsData[sheetId][cellId] = newValue;

        // Notify all other users about the cell update
        socket.broadcast.to(sheetId).emit('cellUpdated', { cellId, newValue });
    });

    // Handling cell lock
    socket.on('lockCell', (data) => {
        const { sheetId, cellId } = data;
        
        // Notify all other users to lock the cell
        socket.broadcast.to(sheetId).emit('cellLocked', { cellId });
    });

    // Handling cell unlock
    socket.on('unlockCell', (data) => {
        const { sheetId, cellId } = data;
        
        // Notify all other users to unlock the cell
        socket.broadcast.to(sheetId).emit('cellUnlocked', { cellId });
    });

    // Joining a specific sheet room
    socket.on('joinSheet', (sheetId) => {
        socket.join(sheetId);
    });

    socket.on('disconnect', () => {
        console.log('A user disconnected');
    });
});

server.listen(3000, () => {
    console.log('Server is running on port 3000');
});

Conclusion

WebSockets and Socket.io have transformed the way we develop real-time applications. By enabling low-latency, persistent communication between clients and servers, these technologies allow us to build collaborative, interactive applications efficiently. The project described above demonstrates the power and flexibility of WebSockets and Socket.io in creating a seamless user experience for real-time collaboration.

By leveraging these tools, we were able to provide a robust solution that ensured all users remained synchronized, thus enhancing productivity and collaboration. Whether you’re developing a collaborative tool, a chat application, or any other real-time service, WebSockets and Socket.io are a good option and is worth mastering.

The frontend implementation for this will be given in a separate article with the full ReactJS code.

About Node.js Worker Threads and Multithreading Misconceptions

Introduction

Node.js is renowned for its single-threaded, non-blocking architecture, which is powered by the event loop and ‘libuv‘. However, this has led to a common misconception that Node.js cannot utilize multiple threads for concurrent operations. This article demystifies Node.js’s threading capabilities by introducing Worker Threads and explaining how they can be used for long-running tasks, such as database operations.

The Role of libuv in Node.js

Node.js uses ‘libuv‘, a multi-platform support library with a focus on asynchronous I/O. ‘libuv‘ manages a thread pool, which can handle file system operations, DNS resolution, and other non-JavaScript operations that require asynchronous execution. While JavaScript code runs on a single thread, ‘libuv‘ ensures that blocking operations are offloaded to these worker threads.

Node.js Worker Threads

Introduced in Node.js 10.5.0, Worker Threads provide a way to run JavaScript code in parallel threads. This is particularly useful for CPU-intensive tasks and operations that would otherwise block the event loop.

Example: Using Worker Threads for a Long-Running Database Operation

Let’s explore a practical example of using Worker Threads to handle a long-running database operation without blocking the main thread.

  • Initialize the project and install dependencies:
mkdir node-worker-example
cd node-worker-example
npm init -y
npm install express mysql2 
  • Create the project structure:
  • Worker Thread Implementation:

Create a worker.js file to define the worker:

// worker.js
const { parentPort } = require('worker_threads');
const mysql = require('mysql2/promise');

const dbConfig = {
    host: 'localhost',
    user: 'db_user',
    password: 'db_pw',
    database: 'db'
};

async function longRunningDatabaseOperation() {
    const connection = await mysql.createConnection(dbConfig);
    try {
        const [rows] = await connection.execute('SELECT SLEEP(10); SELECT * FROM test_table');
        return rows;
    } catch (error) {
        throw error;
    } finally {
        await connection.end();
    }
}

parentPort.on('message', async (message) => {
    if (message === 'start') {
        try {
            const result = await longRunningDatabaseOperation();
            parentPort.postMessage({ status: 'success', data: result });
        } catch (error) {
            parentPort.postMessage({ status: 'error', error: error.message });
        }
    }
});
  • Main Application Setup:

Create an index.js file for the main application:

// index.js
const express = require('express');
const { Worker } = require('worker_threads');

const app = express();
const port = 3000;

app.get('/non-blocking', (req, res) => {
    res.json({ status: 'non blocking finished...' });
}
app.get('/start-operation', (req, res) => {
    const worker = new Worker('./worker.js');

    worker.on('message', (message) => {
        if (message.status === 'success') {
            res.json({ status: 'completed', data: message.data });
        } else {
            res.status(500).json({ status: 'error', error: message.error });
        }
    });

    worker.on('error', (error) => {
        res.status(500).json({ status: 'error', error: error.message });
    });

    worker.on('exit', (code) => {
        if (code !== 0) {
            console.error(`Worker stopped with exit code ${code}`);
        }
    });

    worker.postMessage('start');
    res.json({ status: 'processing' });
});

app.get('/', (req, res) => {
    res.send('Hello, world!');
});

app.listen(port, () => {
    console.log(`Server running at http://localhost:${port}`);
});

This example demonstrates how to leverage Worker Threads for a long-running database operation, ensuring that other requests continue to be processed efficiently. Happy coding!

Caveats

While Worker Threads in Node.js offer significant advantages for handling CPU-intensive and long-running tasks, they also come with some drawbacks.

  • Increased Complexity
    • Concurrency Issues: Introducing multiple threads can lead to issues such as race conditions, deadlocks, and other concurrency-related bugs, making the code harder to debug and maintain.
    • Communication Overhead: Communicating between the main thread and worker threads requires serialization and deserialization of messages, which can introduce overhead and complexity.
  • Performance Considerations
    • Thread Creation Overhead: Creating and managing worker threads incurs some overhead, which might negate the performance benefits for small or simple tasks.
    • Resource Consumption: Each worker thread consumes additional memory and CPU resources. For tasks that are not CPU-bound or do not benefit significantly from parallel execution, this can lead to inefficiencies.
  • Debugging and Profiling
    • Complex Debugging: Debugging issues in a multithreaded environment is generally more complex than in a single-threaded one. Tools and techniques for debugging need to account for the parallel execution context.
    • Profiling Challenges: Performance profiling in a multithreaded application can be more challenging, as it requires analyzing multiple execution contexts simultaneously.
  • Compatibility and Ecosystem
    • Module Compatibility: Not all Node.js modules are thread-safe or designed to work in a multithreaded environment. This can limit the choice of modules or require additional effort to ensure compatibility.
    • Library Support: While many libraries are compatible with Worker Threads, some may not be, or they may require additional configuration to work correctly in a multithreaded context.
  • Development Overhead
    • Learning Curve: Developers need to understand the nuances of working with threads, including thread synchronization, message passing, and potential pitfalls of concurrent execution.
    • Increased Code Complexity: Managing worker threads and ensuring proper communication and synchronization can increase the overall complexity of the application codebase.
  • Use Case Suitability
    • Not Always Necessary: For many I/O-bound tasks, Node.js’s non-blocking, asynchronous nature provides sufficient performance without the need for Worker Threads. Using Worker Threads for such tasks may not provide significant benefits and can complicate the architecture unnecessarily.

Conclusion

Node.js’s Worker Threads offer a powerful way to handle CPU-intensive and long-running tasks without blocking the main thread. This capability, coupled with libuv‘s asynchronous I/O operations, debunks the myth that Node.js cannot handle multithreading. By using Worker Threads, developers can build more efficient and responsive applications.

While Worker Threads provide powerful capabilities for handling CPU-intensive and long-running tasks in Node.js, they also introduce complexity and potential performance issues. It is essential to evaluate whether the benefits of using Worker Threads outweigh the drawbacks for your specific use case. For many applications, Node.js’s asynchronous, event-driven model may be sufficient, and Worker Threads should be used judiciously to avoid unnecessary complexity and resource consumption.

Understanding Redux: The Power of State Management in React Applications

State management is a crucial aspect of building scalable and maintainable applications. In React, managing state can become complex as your application grows. Redux is a powerful library that helps manage state efficiently and predictably. In this article, we will explore the advantages of a state management system, introduce Redux, discuss its pros and cons, and provide a real-world example of setting up and using Redux in a React app for user authentication.

Why Do We Need a State Management System?

As our application grows, managing state across various components becomes challenging. A state management system helps by:

  • Centralizing State: It provides a single source of truth for your application’s state.
  • Predictable State Updates: State updates are predictable due to strict rules on how state changes.
  • Easier Debugging: Tools like Redux DevTools make it easier to track state changes and debug issues.
  • Improved Maintainability: Centralized state management improves code organization and maintainability.

Introduction to Redux

Redux is a popular state management library for JavaScript applications, often used with React. It follows three core principles:

  • Single Source of Truth: The global state of your application is stored in an object tree within a single store.
  • State is Read-Only: The only way to change the state is by dispatching an action, an object that describes what happened.
  • Changes are Made with Pure Functions: To specify how the state tree is transformed by actions, you write pure reducers.

Advantages of Redux

  • Predictability: With a single source of truth and pure functions, state changes are predictable and easy to debug.
  • Maintainability: Clear separation of concerns makes the codebase easier to maintain.
  • Developer Tools: Redux DevTools provide powerful tools for debugging and time-traveling through state changes.
  • Community and Ecosystem: Redux has a large community and a rich ecosystem of middleware and extensions.

Disadvantages of Redux

  • Boilerplate Code: Setting up Redux requires writing a significant amount of boilerplate code.
  • Learning Curve: Understanding Redux concepts like actions, reducers, and middleware can be challenging for beginners.
  • Complexity for Small Apps: For small applications, Redux might be overkill and add unnecessary complexity.

Setting Up Redux in a React Application for User Authentication

Let’s walk through setting up Redux in a React application with a real-world example: a user authentication app.

  • Install Redux and React-Redux
npm install redux react-redux
  • Create Redux Store

Create a store.js file to set up the Redux store:

import { createStore } from 'redux';
import rootReducer from './reducers';

const store = createStore(rootReducer);

export default store;
  • Create Reducers

Create a reducers folder with an index.js file and an auth.js file:

‘reducers/index.js’:

import { combineReducers } from 'redux';
import authReducer from './auth';

const rootReducer = combineReducers({
  auth: authReducer
});

export default rootReducer;

‘reducers/auth.js’:

const initialState = {
  isAuthenticated: false,
  user: null,
};

const authReducer = (state = initialState, action) => {
  switch (action.type) {
    case 'LOGIN_SUCCESS':
      return {
        ...state,
        isAuthenticated: true,
        user: action.payload,
      };
    case 'LOGOUT':
      return {
        ...state,
        isAuthenticated: false,
        user: null,
      };
    default:
      return state;
  }
};

export default authReducer;
  • Create Actions

Create an 'actions' folder with' authActions.js':

export const loginSuccess = (user) => ({
  type: 'LOGIN_SUCCESS',
  payload: user,
});

export const logout = () => ({
  type: 'LOGOUT',
});
  • Setup Provider

Wrap your app with the Provider component from 'react-redux in index.js':

import React from 'react';
import ReactDOM from 'react-dom';
import { Provider } from 'react-redux';
import store from './store';
import App from './App';

ReactDOM.render(
  <Provider store={store}>
    <App />
  </Provider>,
  document.getElementById('root')
);
  • Connect Components

Use the 'connect' function to connect your components to the Redux store. Create an 'Auth.js' component:

import React from 'react';
import { connect } from 'react-redux';
import { loginSuccess, logout } from './actions/authActions';

function Auth({ isAuthenticated, user, loginSuccess, logout }) {
  const handleLogin = () => {
    const user = { name: 'John Doe', email: 'john.doe@example.com' };
    loginSuccess(user);
  };

  const handleLogout = () => {
    logout();
  };

  return (
    <div>
      {isAuthenticated ? (
        <div>
          <h1>Welcome, {user.name}</h1>
          <button onClick={handleLogout}>Logout</button>
        </div>
      ) : (
        <div>
          <h1>Please log in</h1>
          <button onClick={handleLogin}>Login</button>
        </div>
      )}
    </div>
  );
}

const mapStateToProps = (state) => ({
  isAuthenticated: state.auth.isAuthenticated,
  user: state.auth.user,
});

const mapDispatchToProps = {
  loginSuccess,
  logout,
};

export default connect(mapStateToProps, mapDispatchToProps)(Auth);
  • Create App Component

Finally, create an 'App.js' file:

import React from 'react';
import Auth from './Auth';

function App() {
  return (
    <div className="App">
      <Auth />
    </div>
  );
}

export default App;

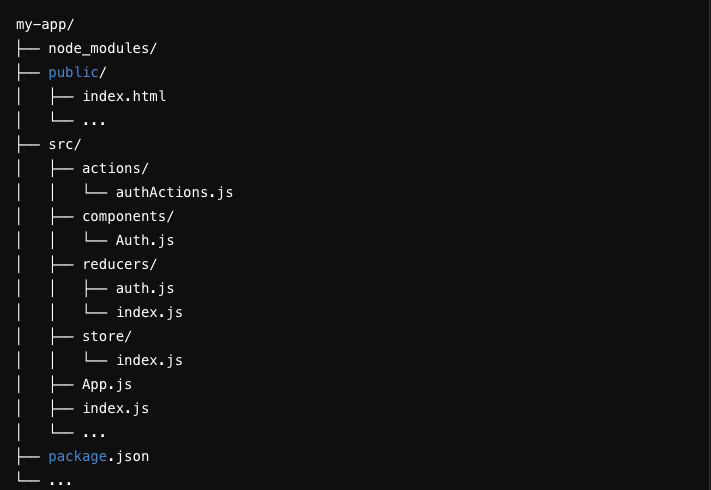
Folder Structure

Conclusion

Redux is a powerful state management tool that can significantly improve the predictability, maintainability, and scalability of your React applications. While it comes with a learning curve and some boilerplate, its advantages often outweigh the drawbacks, especially in large applications. By following the step-by-step guide provided, you can set up Redux in your React app and start managing state more effectively, as demonstrated with our user authentication example.

Solving jQuery Version Conflict in the Same Project

In a recent project I was leading, we faced an interesting challenge that I believe is worth sharing. Our legacy codebase heavily relied on jQuery 1.1.8, but we needed to integrate Google Maps into our application, which required a newer version of jQuery (at least 1.2). Rewriting or upgrading the entire application to use a newer jQuery version was not feasible due to time constraints and potential risk of breaking existing functionality. Here’s how we managed to use two different versions of jQuery on the same page without any conflicts.

The Problem

Our existing application used jQuery 1.1.8, and changing this version was not an option due to the extensive usage throughout the codebase. However, the Google Maps API required at least jQuery 1.2. This version incompatibility posed a significant challenge, as loading multiple versions of jQuery can lead to conflicts.

The Solution

The solution involved using jQuery’s noConflict mode to manage multiple versions on the same page. Here’s a step-by-step guide on how we implemented this.

  • Load the Older Version of jQuery

First, we ensured that the older version of jQuery (1.1.8) was loaded as usual for our existing application functionality.

<!DOCTYPE html>
<html>
<head>
  <title>Multiple jQuery Versions Example</title>
  <!-- Load the older version of jQuery (1.1.8) -->
  <script src="path/to/jquery-1.1.8.min.js"></script>
</head>
<body>
  <!-- Our existing code and scripts that depends on jQuery 1.1.8 -->

  <!-- Google Maps section -->
  <div id="map-canvas" style="width: 100%; height: 400px;"></div>

  <!-- Load the newer version of jQuery -->
  
  <!-- Load the Google Maps API -->
  <script src="https://maps.googleapis.com/maps/api/js?key=<OUR API KEY>"></script>
</body>
</html>
  • Load the Newer Version of jQuery

Next, we loaded the newer version of jQuery required for the Google Maps API. We used the noConflict method to ensure it did not interfere with the older version.

<!-- Load the newer version of jQuery -->
<script src="https://ajax.googleapis.com/ajax/libs/jquery/1.12.4/jquery.min.js"></script>
<script>
  var jQueryNew = $.noConflict(true);
</script>

The true parameter in the noConflict method call ensures that the new jQuery version is completely isolated, preventing it from overriding the older version.

  • Initialize Google Maps Using the Newer jQuery Version

We then wrote the Google Maps initialization code using the new jQuery version (jQueryNew).

<script>
  jQueryNew(document).ready(function($) {
    function initialize() {
      var mapOptions = {
        zoom: 8,
        center: new google.maps.LatLng(-34.397, 150.644)
      };
      var map = new google.maps.Map(document.getElementById('map-canvas'), mapOptions);
    }
    
    google.maps.event.addDomListener(window, 'load', initialize);
  });
</script>

Complete solution looked like

<!DOCTYPE html>
<html>
<head>
  <title>Multiple jQuery Versions Example</title>
  <!-- Load the older version of jQuery (1.1.8) -->
  <script src="path/to/jquery-1.1.8.min.js"></script>
</head>
<body>
  <!-- Your existing content that depends on jQuery 1.1.8 -->

  <!-- Google Maps section -->
  <div id="map-canvas" style="width: 100%; height: 400px;"></div>

  <!-- Load the newer version of jQuery -->
  <script src="https://ajax.googleapis.com/ajax/libs/jquery/1.12.4/jquery.min.js"></script>
  <script>
    var jQueryNew = $.noConflict(true);

    jQueryNew(document).ready(function($) {
      function initialize() {
        var mapOptions = {
          zoom: 8,
          center: new google.maps.LatLng(-34.397, 150.644)
        };
        var map = new google.maps.Map(document.getElementById('map-canvas'), mapOptions);
      }
      
      google.maps.event.addDomListener(window, 'load', initialize);
    });
  </script>

  <!-- Load the Google Maps API -->
  <script src="https://maps.googleapis.com/maps/api/js?key=YOUR_API_KEY"></script>
</body>
</html>

Conclusion

By using jQuery’s noConflict mode, we successfully integrated Google Maps into our project without upgrading the entire codebase to a newer jQuery version. This approach allowed us to meet the project requirements while minimizing risks and maintaining the stability of our existing application.

I hope this solution helps others facing similar challenges. If you have any questions or need further clarification, feel free to leave a comment!