
State management is a crucial aspect of building scalable and maintainable applications. In React, managing state can become complex as your application grows. Redux is a powerful library that helps manage state efficiently and predictably. In this article, we will explore the advantages of a state management system, introduce Redux, discuss its pros and cons, and provide a real-world example of setting up and using Redux in a React app for user authentication.
Why Do We Need a State Management System?
As our application grows, managing state across various components becomes challenging. A state management system helps by:
- Centralizing State: It provides a single source of truth for your application’s state.
- Predictable State Updates: State updates are predictable due to strict rules on how state changes.
- Easier Debugging: Tools like Redux DevTools make it easier to track state changes and debug issues.
- Improved Maintainability: Centralized state management improves code organization and maintainability.
Introduction to Redux
Redux is a popular state management library for JavaScript applications, often used with React. It follows three core principles:
- Single Source of Truth: The global state of your application is stored in an object tree within a single store.
- State is Read-Only: The only way to change the state is by dispatching an action, an object that describes what happened.
- Changes are Made with Pure Functions: To specify how the state tree is transformed by actions, you write pure reducers.
Advantages of Redux
- Predictability: With a single source of truth and pure functions, state changes are predictable and easy to debug.
- Maintainability: Clear separation of concerns makes the codebase easier to maintain.
- Developer Tools: Redux DevTools provide powerful tools for debugging and time-traveling through state changes.
- Community and Ecosystem: Redux has a large community and a rich ecosystem of middleware and extensions.
Disadvantages of Redux
- Boilerplate Code: Setting up Redux requires writing a significant amount of boilerplate code.
- Learning Curve: Understanding Redux concepts like actions, reducers, and middleware can be challenging for beginners.
- Complexity for Small Apps: For small applications, Redux might be overkill and add unnecessary complexity.
Setting Up Redux in a React Application for User Authentication
Let’s walk through setting up Redux in a React application with a real-world example: a user authentication app.
- Install Redux and React-Redux
npm install redux react-redux
- Create Redux Store
Create a store.js file to set up the Redux store:
import { createStore } from 'redux';
import rootReducer from './reducers';

const store = createStore(rootReducer);

export default store;
- Create Reducers
Create a reducers folder with an index.js file and an auth.js file:
‘reducers/index.js’:
import { combineReducers } from 'redux';
import authReducer from './auth';

const rootReducer = combineReducers({
  auth: authReducer
});

export default rootReducer;
‘reducers/auth.js’:
const initialState = {
  isAuthenticated: false,
  user: null,
};

const authReducer = (state = initialState, action) => {
  switch (action.type) {
    case 'LOGIN_SUCCESS':
      return {
        ...state,
        isAuthenticated: true,
        user: action.payload,
      };
    case 'LOGOUT':
      return {
        ...state,
        isAuthenticated: false,
        user: null,
      };
    default:
      return state;
  }
};

export default authReducer;
- Create Actions
Create an 'actions' folder with' authActions.js':
export const loginSuccess = (user) => ({
  type: 'LOGIN_SUCCESS',
  payload: user,
});

export const logout = () => ({
  type: 'LOGOUT',
});
- Setup Provider
Wrap your app with the Provider component from 'react-redux in index.js':
import React from 'react';
import ReactDOM from 'react-dom';
import { Provider } from 'react-redux';
import store from './store';
import App from './App';

ReactDOM.render(
  <Provider store={store}>
    <App />
  </Provider>,
  document.getElementById('root')
);
- Connect Components
Use the 'connect' function to connect your components to the Redux store. Create an 'Auth.js' component:
import React from 'react';
import { connect } from 'react-redux';
import { loginSuccess, logout } from './actions/authActions';

function Auth({ isAuthenticated, user, loginSuccess, logout }) {
  const handleLogin = () => {
    const user = { name: 'John Doe', email: 'john.doe@example.com' };
    loginSuccess(user);
  };

  const handleLogout = () => {
    logout();
  };

  return (
    <div>
      {isAuthenticated ? (
        <div>
          <h1>Welcome, {user.name}</h1>
          <button onClick={handleLogout}>Logout</button>
        </div>
      ) : (
        <div>
          <h1>Please log in</h1>
          <button onClick={handleLogin}>Login</button>
        </div>
      )}
    </div>
  );
}

const mapStateToProps = (state) => ({
  isAuthenticated: state.auth.isAuthenticated,
  user: state.auth.user,
});

const mapDispatchToProps = {
  loginSuccess,
  logout,
};

export default connect(mapStateToProps, mapDispatchToProps)(Auth);
- Create App Component
Finally, create an 'App.js' file:
import React from 'react';
import Auth from './Auth';

function App() {
  return (
    <div className="App">
      <Auth />
    </div>
  );
}

export default App;
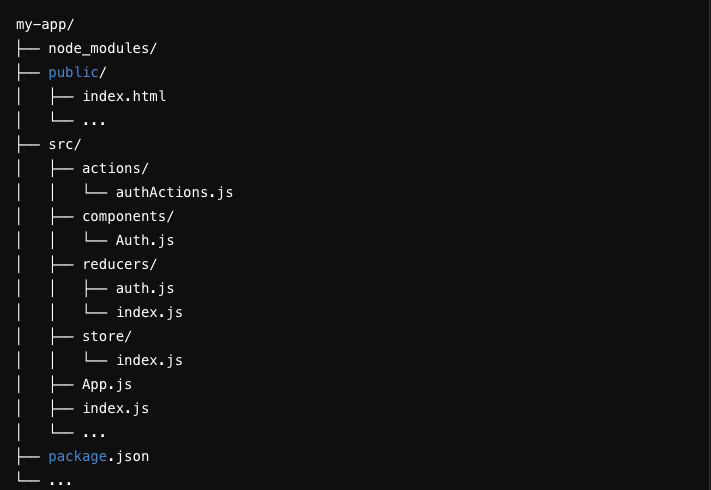
Folder Structure
Conclusion
Redux is a powerful state management tool that can significantly improve the predictability, maintainability, and scalability of your React applications. While it comes with a learning curve and some boilerplate, its advantages often outweigh the drawbacks, especially in large applications. By following the step-by-step guide provided, you can set up Redux in your React app and start managing state more effectively, as demonstrated with our user authentication example.